peterd51
happy to be here!
- Messages
- 1,593
Hi,
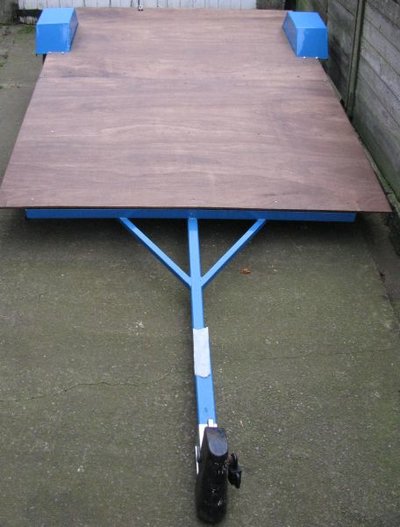
I have a trailer for the Hovercraft but it's an old caravan chassis and it's too wide to put it up the top end of our drive. Bobbie can't get past it to hang out the washing. So I've been thinking for a while about making a new trailer...like a boat trailer where the wheels are set quite far back but also with a 'deck' so I can carry anything else that I might need to shift.
The hover is 10'x 6' so I decided the trailer deck should be 8' x 4'. The hover sides will overhang but only over the wheels and the front and rear would overhang by about a foot or so. The main weight in the hovercraft is the engine, fan and pulleys, etc, which is located around three to four feet in from the rear end and I tried to get this just in front of the axle.
Looking aroung the workshop I found an old pair of Indespension units, some 40mm x 4mm & 50mm x 5mm box. I have plenty of off cuts and some old market stall rails, 1" box 16 guage. Also a week or so before by brother and my brother-in-law both gave me a pair of old bed angle rails. I'd also scrounged a few lengths of 2" square wood out of our skip at work but it was only six feet long, so I needed to be a bit crafty with it. If the main length went to the back of the trailer then the two feet behind the axle would be counter balanced by the four feet going towards the front. I'd just need a cross-rail up towards the front to take the joints and I could cut up some of the wood to make 2' lengths for the front end rails.
Two of the bed rails going across the trailer would be too long by about two feet and the other two going up the sides would be too short by about two feet so the first job was to cut off two pieces and weld them onto the other two pieces. Using another piece of angle to keep everything lined up I joined these on and then after pre-drilling screw holes for the wood I joined the four sections together to make a rectangle. It's odd stuff to weld...I know it work hardens when drilled but it doesn't seem to 'melt' properly at normal welder settings, I ended up doing two welds, one on each side and it's only 3mm thick!

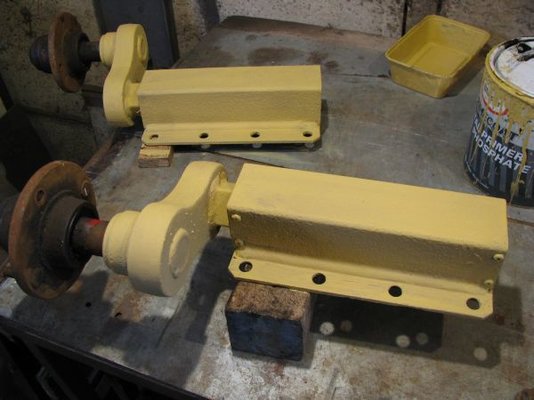
I'd decided to make the 'bed' 54 inches wide and this gave me the width of the axle. Next I attached the two plates for the suspension units to bolt onto. I bought these in as they were only a few pounds each and I didn't fancy all the drilling (16 holes!).

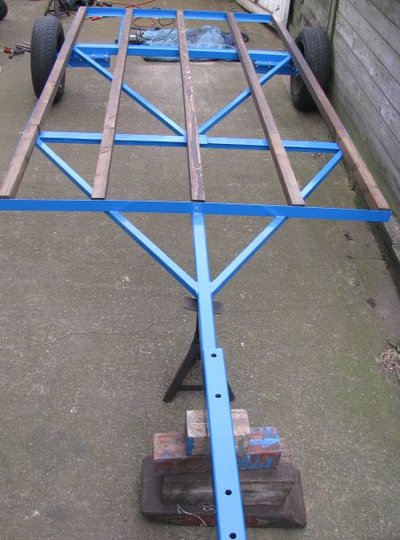
The tow-pole is 40mm and around nine feet long as that's what I had available. As I'd got a 50mm tow-hitch (new) and that really needed to be on 50mm box I knew I could add a bit to the front end so I wasn't too concerned that this might be a bit short to allow the hovercraft bows to miss the back of the car on tight turns. The initial chassis was finished off with some reclaimed (old stall) 1" box to make the 'A' stabilisers. Some of these pieces were too short so I joined them together with a bit of 20mm box inside. Set them up on the spare angle iron to keel them straight with a 2 - 3mm gap and weld onto the inner allowing the weld to flow onto the two outer pieces. It makes a strong joint and although I've never tested it I believe it's stronger than standard 1" box.

Once I'd got the bed on top I could adjust the position to get the engine where I wanted it and welded it in place. I added a couple of strengtheners to the rear end, angled slightly down to the bottom of the axle and the next step was to add in the crosspiece that the wood joints would sit on. This was a bit of 40mm flat with a bit of 1" box underneath...I pre-drilled the screw-holes. Next I could add the two front 'stabiliser' rails to stop the front corners wobbling around and to stiffen up the tow-bar. Last job on the chassis was to add the front extension for the tow-hitch.

By this time I'd got the wheels on (bought a set of 12" mini wheels off Ebay) and that gave me the height of the bed. Measuring the height of the car tow-bar I decided to add the 50mm box above the 40mm. As well as the welds I've drilled two 12mm holes and installed box inside to strengthen it (I might trust my welding but I don't trust it /that/ much!). I also added end-caps with drain holes.

Continued in next message
I have a trailer for the Hovercraft but it's an old caravan chassis and it's too wide to put it up the top end of our drive. Bobbie can't get past it to hang out the washing. So I've been thinking for a while about making a new trailer...like a boat trailer where the wheels are set quite far back but also with a 'deck' so I can carry anything else that I might need to shift.
The hover is 10'x 6' so I decided the trailer deck should be 8' x 4'. The hover sides will overhang but only over the wheels and the front and rear would overhang by about a foot or so. The main weight in the hovercraft is the engine, fan and pulleys, etc, which is located around three to four feet in from the rear end and I tried to get this just in front of the axle.
Looking aroung the workshop I found an old pair of Indespension units, some 40mm x 4mm & 50mm x 5mm box. I have plenty of off cuts and some old market stall rails, 1" box 16 guage. Also a week or so before by brother and my brother-in-law both gave me a pair of old bed angle rails. I'd also scrounged a few lengths of 2" square wood out of our skip at work but it was only six feet long, so I needed to be a bit crafty with it. If the main length went to the back of the trailer then the two feet behind the axle would be counter balanced by the four feet going towards the front. I'd just need a cross-rail up towards the front to take the joints and I could cut up some of the wood to make 2' lengths for the front end rails.
Two of the bed rails going across the trailer would be too long by about two feet and the other two going up the sides would be too short by about two feet so the first job was to cut off two pieces and weld them onto the other two pieces. Using another piece of angle to keep everything lined up I joined these on and then after pre-drilling screw holes for the wood I joined the four sections together to make a rectangle. It's odd stuff to weld...I know it work hardens when drilled but it doesn't seem to 'melt' properly at normal welder settings, I ended up doing two welds, one on each side and it's only 3mm thick!

I'd decided to make the 'bed' 54 inches wide and this gave me the width of the axle. Next I attached the two plates for the suspension units to bolt onto. I bought these in as they were only a few pounds each and I didn't fancy all the drilling (16 holes!).

The tow-pole is 40mm and around nine feet long as that's what I had available. As I'd got a 50mm tow-hitch (new) and that really needed to be on 50mm box I knew I could add a bit to the front end so I wasn't too concerned that this might be a bit short to allow the hovercraft bows to miss the back of the car on tight turns. The initial chassis was finished off with some reclaimed (old stall) 1" box to make the 'A' stabilisers. Some of these pieces were too short so I joined them together with a bit of 20mm box inside. Set them up on the spare angle iron to keel them straight with a 2 - 3mm gap and weld onto the inner allowing the weld to flow onto the two outer pieces. It makes a strong joint and although I've never tested it I believe it's stronger than standard 1" box.

Once I'd got the bed on top I could adjust the position to get the engine where I wanted it and welded it in place. I added a couple of strengtheners to the rear end, angled slightly down to the bottom of the axle and the next step was to add in the crosspiece that the wood joints would sit on. This was a bit of 40mm flat with a bit of 1" box underneath...I pre-drilled the screw-holes. Next I could add the two front 'stabiliser' rails to stop the front corners wobbling around and to stiffen up the tow-bar. Last job on the chassis was to add the front extension for the tow-hitch.

By this time I'd got the wheels on (bought a set of 12" mini wheels off Ebay) and that gave me the height of the bed. Measuring the height of the car tow-bar I decided to add the 50mm box above the 40mm. As well as the welds I've drilled two 12mm holes and installed box inside to strengthen it (I might trust my welding but I don't trust it /that/ much!). I also added end-caps with drain holes.

Continued in next message


 .
.
