- Forums
- Tools, Compressors and Metal Coatings
- Tools, Materials and Techniques
- CAD/CAM, 3D Printing and Laser Cutting
You are using an out of date browser. It may not display this or other websites correctly.
You should upgrade or use an alternative browser.
You should upgrade or use an alternative browser.
How do I mirror image a part in Design Spark Mechanical?
- Thread starter ajlelectronics
- Start date
ajlelectronics
Member
- Messages
- 10,747
- Location
- Gloucester, England
I did a bit of googling & it looks like the DXF might be a 3D one. If you try exporting that, I'm happy to see if it'll import elsewhere.
ajlelectronics
Member
- Messages
- 10,747
- Location
- Gloucester, England
Dr.Al
Forum Supporter
- Messages
- 2,507
- Location
- Gloucestershire, UK
That one doesn't seem to work unfortunately. Even Fusion 360 (which, being an Autodesk application, should be able to read any DXF) just loaded it as a flattened image:This was from selecting .dxf and then the STEP option.
Might be worth trying a handful of other export formats: something might work.
I'd forgotten how slow everything goes on my computer when Fusion 360 is running!
Screwdriver
Member
- Messages
- 10,719
It does export .skp!
Sketchup is free (and awesome). It's also available at an internet near you.
Or send me the .skp (or .dxf).
S.
Sketchup is free (and awesome). It's also available at an internet near you.
Or send me the .skp (or .dxf).
S.
Tangledfeet
Think outside, no box required.
- Messages
- 3,173
- Location
- Top of a hill above St Andrews, Fife
@ajlelectronics Hehe, that's one filetype Inventor won't open! 
Currently downloading and installing DesignSpark...

Currently downloading and installing DesignSpark...
Dr.Al
Forum Supporter
- Messages
- 2,507
- Location
- Gloucestershire, UK
What might be a good (and slightly quicker test) would be for you (@ajlelectronics) to export all the various file types that you can find in the DesignSpark options. Then re-import them back into DesignSpark.
If you end up with a mesh (mess of triangles) like the one you'd get from STL, 3MF, AMF or OBJ, then move along. If you end up with something 2D, move along. If you get something editable that looks about right, we have a winner and chances are we'll be able to find something that will import it.
If you end up with a mesh (mess of triangles) like the one you'd get from STL, 3MF, AMF or OBJ, then move along. If you end up with something 2D, move along. If you get something editable that looks about right, we have a winner and chances are we'll be able to find something that will import it.
Agroshield
Member
- Messages
- 6,014
There seems to be an awful lot of time and effort being wasted here.
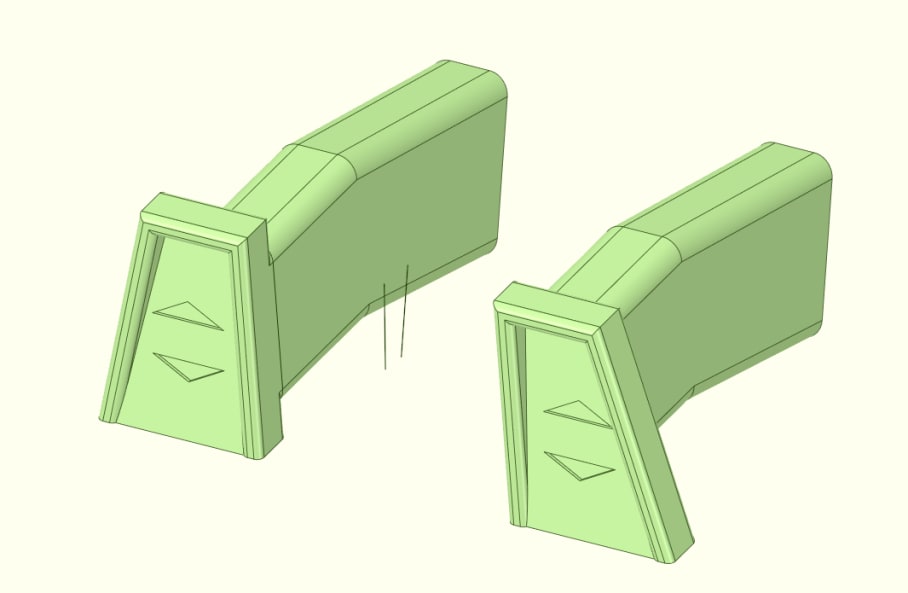
If you have designed the part yourself, save a copy of it, delete the geometry you do not want (to me it looks like the back end is common to both hands; it is just the front that is mirrored. The up and down arrows just need moving in space - translating not mirroring) and recreate the new geometry. Having made one successfully, you know the commands to do it, you know the dimensions you need.
Learn from this exercise that if you want mirrored parts in the future, draw everything that is common, then branch the files and work on each separately. To me, needing to mirror a whole model at the end of the creation process points to a shortcoming in your workflow rather than something essential missing in the software.
ajlelectronics
Member
- Messages
- 10,747
- Location
- Gloucester, England
Another response from the DSM forum...
15 Dec 2022 17:36
The answer from me does actually use the mirror line in sketch planes - except not from the beginning.
Like Jacant, a simple copy and split body is exactly right but I'd then do it slightly differently - all fairly easy - but i'll admit, not as easy a a direct 3D mirror copy command.

In a sketch, the geometry on that sketch can be used to project onto itself obviously, but with an active mirror line it will also create the basis of a mirror sketch - same for the 2 arrow shapes. In sketch plane, when you have the reflected curves, before exiting the sketch, undisplay the solids, off the mirror line and delete the unnecessary reflected curves. Exit sketch, display the solids and pull the surfaces to create cuts, protrusions etc.
hope that helps.
In V6, there's an alternative upgraded solution to 3D solid body mirroring - it will work for some users, but not for all users no doubt - they'll still be the existing standard principle of using the mirror line in a sketch and progressingly building solids etc, which works very well - for instance, 3D mirror relationships on mirror symmetrical faces can be established automatically even though they were not initially considered. But yes, I'll concede it takes reading how to do. DSM has a tutorial section in which the principles are outlined - the RS YT video's , this one explains...(4) DesignSpark Mechanical - Mirror symmetry with construction line (PART 1) - YouTube
15 Dec 2022 17:36
The answer from me does actually use the mirror line in sketch planes - except not from the beginning.
Like Jacant, a simple copy and split body is exactly right but I'd then do it slightly differently - all fairly easy - but i'll admit, not as easy a a direct 3D mirror copy command.

In a sketch, the geometry on that sketch can be used to project onto itself obviously, but with an active mirror line it will also create the basis of a mirror sketch - same for the 2 arrow shapes. In sketch plane, when you have the reflected curves, before exiting the sketch, undisplay the solids, off the mirror line and delete the unnecessary reflected curves. Exit sketch, display the solids and pull the surfaces to create cuts, protrusions etc.
hope that helps.
In V6, there's an alternative upgraded solution to 3D solid body mirroring - it will work for some users, but not for all users no doubt - they'll still be the existing standard principle of using the mirror line in a sketch and progressingly building solids etc, which works very well - for instance, 3D mirror relationships on mirror symmetrical faces can be established automatically even though they were not initially considered. But yes, I'll concede it takes reading how to do. DSM has a tutorial section in which the principles are outlined - the RS YT video's , this one explains...(4) DesignSpark Mechanical - Mirror symmetry with construction line (PART 1) - YouTube
ajlelectronics
Member
- Messages
- 10,747
- Location
- Gloucester, England
Learn from this exercise that if you want mirrored parts in the future, draw everything that is common, then branch the files and work on each separately. To me, needing to mirror a whole model at the end of the creation process points to a shortcoming in your workflow rather than something essential missing in the software.
Hindsight being 20:20 of course! This was an exercise that I thought would be more trouble than it was to design, so wasn't expecting it to become finished so quickly.
Dr.Al
Forum Supporter
- Messages
- 2,507
- Location
- Gloucestershire, UK
Learn from this exercise that if you want mirrored parts in the future, draw everything that is common, then branch the files and work on each separately. To me, needing to mirror a whole model at the end of the creation process points to a shortcoming in your workflow rather than something essential missing in the software.
This feels like too much of a generalisation to me. Why is a mirror such a bad thing?
This is something I designed a while ago. The two orange "arms" were intentionally made to be mirrors of one another. I drew one, then mirrored it to create its opposite. That seems by far the most efficient way to make the two parts to me. Branching the two parts and working on each separately would just produce lots of unnecessary duplicated effort.
In the ones I've used, with a plm system to control the data, if you "delete", then you "delete" - it's gone, there is no history. If you "hide" or "suppress" (which is what most seem to do when you tell it not to keep the seed part), then somewhere, it reappears, sometimes in the drawing, most often in assemblies used in bigger assemblies, then popping out again when dragged into other systems.That sounds strange. In the CAD systems I've used, the deletion of the original part is an operation in the parametric history like any other.
If you want to change something, just go back in history before the delete, edit the op that you want to change and then fast-forward again. The mirrored part updates as expected.
If I'm really pushed, as a temporary measure to avoid that issue, I will export the mirror as a parasolid or step, then drag that back into a new part as a dumb item - no history tree making editing other than with such as synchronous editing a pain.
I guess if its simply for your own use, then all is good

Dr.Al
Forum Supporter
- Messages
- 2,507
- Location
- Gloucestershire, UK
In the ones I've used, with a plm system to control the data, if you "delete", then you "delete" - it's gone, there is no history. If you "hide" or "suppress" (which is what most seem to do when you tell it not to keep the seed part), then somewhere, it reappears, sometimes in the drawing, most often in assemblies used in bigger assemblies, then popping out again when dragged into other systems.
Sounds painful!
This is what it looks like in Onshape (ZW3D is pretty much the same) if I gradually go back through the history of a quick test model I made for the purpose:
Create a (random shape) sketch:
Extrude:
Mirror about the YZ plane (as a new part rather than as a move):
Delete the original (this would have been simpler by doing the mirror as a move, but I thought this showed the principle better):
As you can probably tell by the way I went back through the history to take the screenshots, the delete is just an operation like any other.
Dr.Al
Forum Supporter
- Messages
- 2,507
- Location
- Gloucestershire, UK
It sounds like you've got an answer for the original problem, but if you want to explore 3D DXFs a bit more, it definitely looks like it should be possible:Another response from the DSM forum...
15 Dec 2022 17:36
The answer from me does actually use the mirror line in sketch planes - except not from the beginning.
Like Jacant, a simple copy and split body is exactly right but I'd then do it slightly differently - all fairly easy - but i'll admit, not as easy a a direct 3D mirror copy command.

In a sketch, the geometry on that sketch can be used to project onto itself obviously, but with an active mirror line it will also create the basis of a mirror sketch - same for the 2 arrow shapes. In sketch plane, when you have the reflected curves, before exiting the sketch, undisplay the solids, off the mirror line and delete the unnecessary reflected curves. Exit sketch, display the solids and pull the surfaces to create cuts, protrusions etc.
hope that helps.
In V6, there's an alternative upgraded solution to 3D solid body mirroring - it will work for some users, but not for all users no doubt - they'll still be the existing standard principle of using the mirror line in a sketch and progressingly building solids etc, which works very well - for instance, 3D mirror relationships on mirror symmetrical faces can be established automatically even though they were not initially considered. But yes, I'll concede it takes reading how to do. DSM has a tutorial section in which the principles are outlined - the RS YT video's , this one explains...(4) DesignSpark Mechanical - Mirror symmetry with construction line (PART 1) - YouTube
I'm working on the assumption here that 3D DXFs are usable in the way that STEP files are, but it seems likely from what I've read. It would be nice to know that there is a way to get your own models out of DesignSpark without having to pay for the premium version. I still think it's ridiculous that such an essential feature as STEP export is considered an "advanced" tool.
Wedg1e
They call me Mr. Bodge-angles
- Messages
- 7,745
- Location
- Teesside, England
That's pretty much how I'd do it in AutoCAD.


