

You are using an out of date browser. It may not display this or other websites correctly.
You should upgrade or use an alternative browser.
You should upgrade or use an alternative browser.
Heat Treatment Oven
- Thread starter Dr.Al
- Start date
Dr.Al
Forum Supporter
- Messages
- 2,788
- Location
- Gloucestershire, UK
If the hinges had through holes, one long peice of straight silversteel would keep them aligned reasonably well, and then weld a cap afterwards?
Sounds sensible, but they don't. The lower part of each hinge has the pin integrated into it. I'd wondered about making something (a long bar with some offset pieces bolted to it to support the hinge pieces while welding them) but it felt like too much hassle in the end and I'm not convinced it would have helped anyway. After tack-welding them in place, the hinges moved freely and could be separated easily. I think they must have moved a bit more when the final weld was done and I'm not convinced a fixture would prevent that movement. Having said that, I'm not exactly an expert welder, so it's highly likely I don't know what I'm talking about!
Onoff
In the land of the unfinished project I am King!
- Messages
- 13,531
- Location
- Sevenoaks, UK
Sounds sensible, but they don't. The lower part of each hinge has the pin integrated into it. I'd wondered about making something (a long bar with some offset pieces bolted to it to support the hinge pieces while welding them) but it felt like too much hassle in the end and I'm not convinced it would have helped anyway. After tack-welding them in place, the hinges moved freely and could be separated easily. I think they must have moved a bit more when the final weld was done and I'm not convinced a fixture would prevent that movement. Having said that, I'm not exactly an expert welder, so it's highly likely I don't know what I'm talking about!
Take some coarse emery to each pin and take the diameter down a gnat's?
Or get the gas on it and encourage whatever hinge over a bit?
Dr.Al
Forum Supporter
- Messages
- 2,788
- Location
- Gloucestershire, UK
Take some coarse emery to each pin and take the diameter down a gnat's?
That would probably work, yes.
Or get the gas on it and encourage whatever hinge over a bit?
I'm not sure which direction I need to move it though!
I'd imagine there's a method that is used by most professionals when they fit these hinges. I'd be interested to hear from anyone who has done so.
Onoff
In the land of the unfinished project I am King!
- Messages
- 13,531
- Location
- Sevenoaks, UK
I'd imagine there's a method that is used by most professionals when they fit these hinges. I'd be interested to hear from anyone who has done so.
Clamp both hinges to a heavy straight edge?
Dr.Al
Forum Supporter
- Messages
- 2,788
- Location
- Gloucestershire, UK
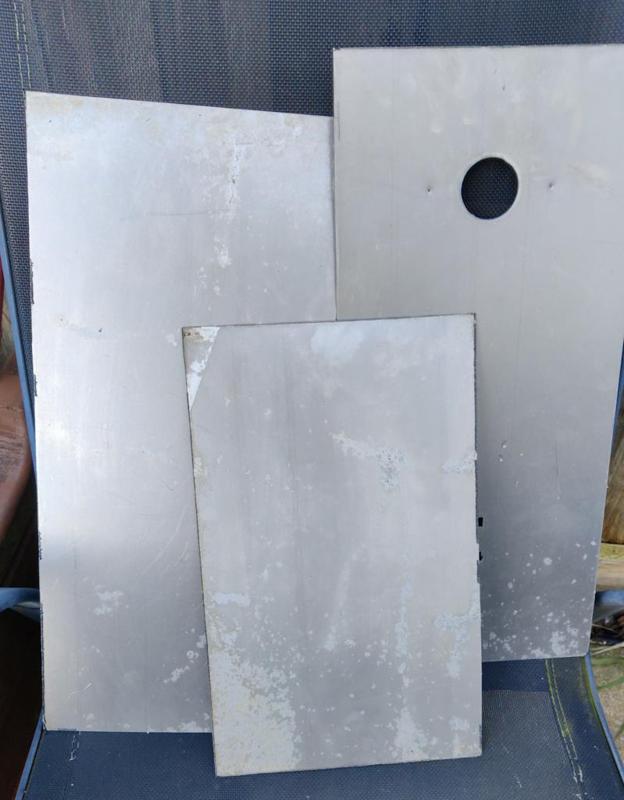
On inspecting the steel sheets (in their citric acid bath) this morning, they still looked slightly rusty, but I pulled them out and gave them a quick wipe with a tissue and the rust came off really easily. At this point, you have to work fast as it's astonishing how quickly they'll start to tarnish once they're out of the acid bath.
I wiped them over with some paper towel and then attacked them with a wire brush. I could have oiled them but I knew I was going to weld them almost immediately so I would have had to clean the oil off again very soon. The wire brush was quite a good work-out for the start of the day anyway considering how much the temperature had dropped overnight.
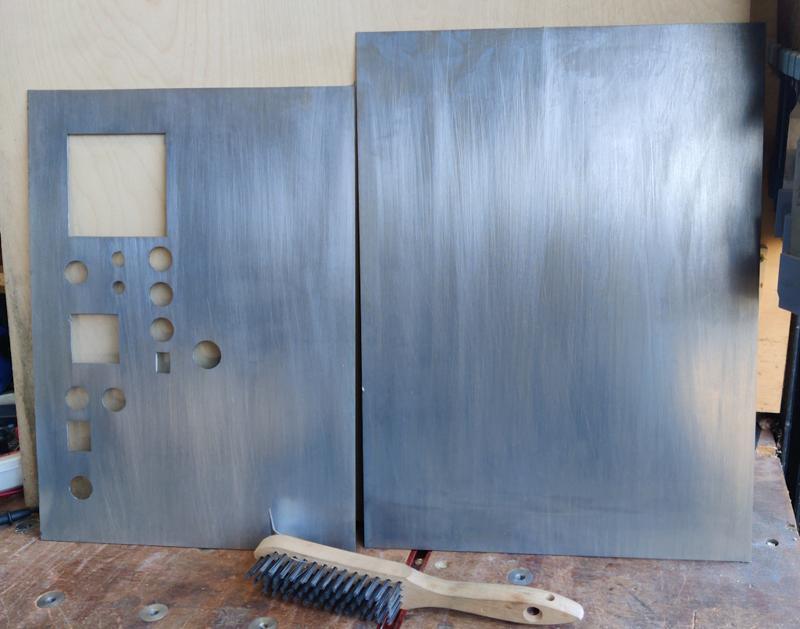
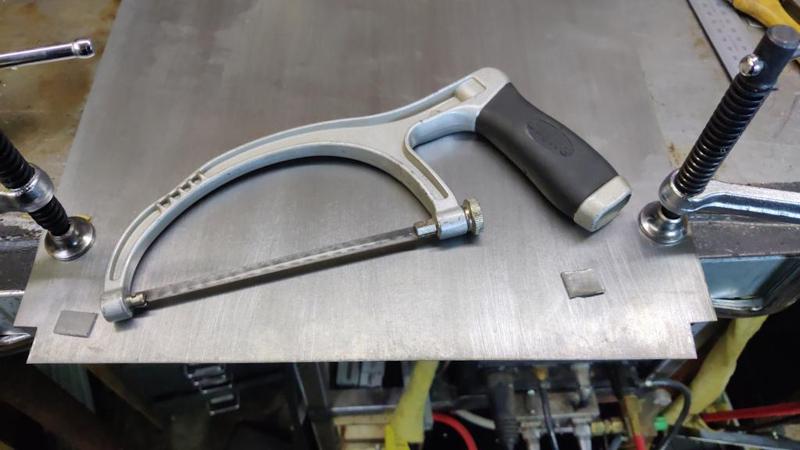
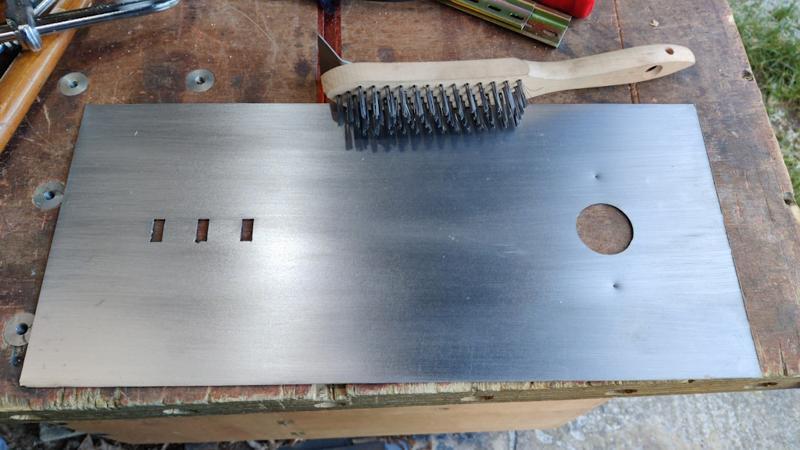
The insert for the back of the control cabinet needed a couple of little cut-outs (because of the weld nuts that I fitted yesterday). I cut out the pockets with a junior hacksaw (as it has finer teeth than my big hacksaw and hence is better for cutting thin sheet). I probably wrecked the blade in the process as it took my an embarrassing amount of time to remember that it was set up (as they usually are) to cut on the push stroke and I've been doing a lot of work with Japanese woodwork pull saws recently! Nevertheless, it did the job quite quickly:
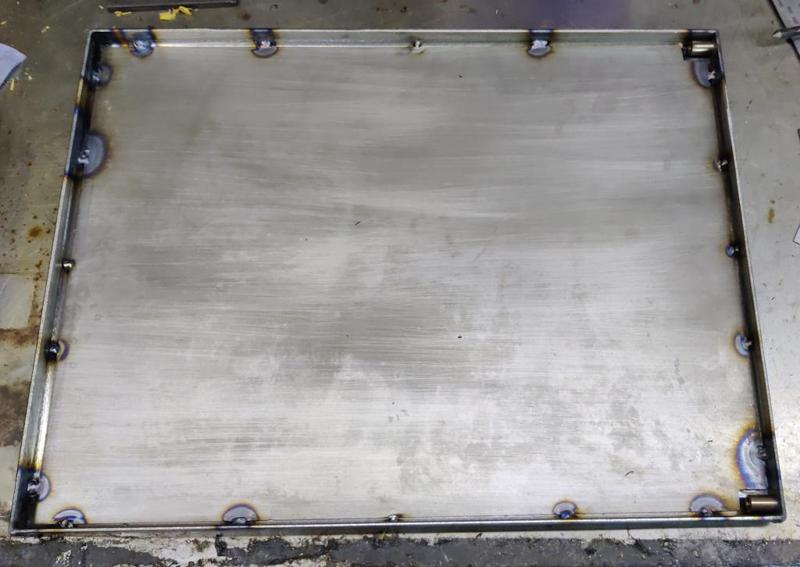
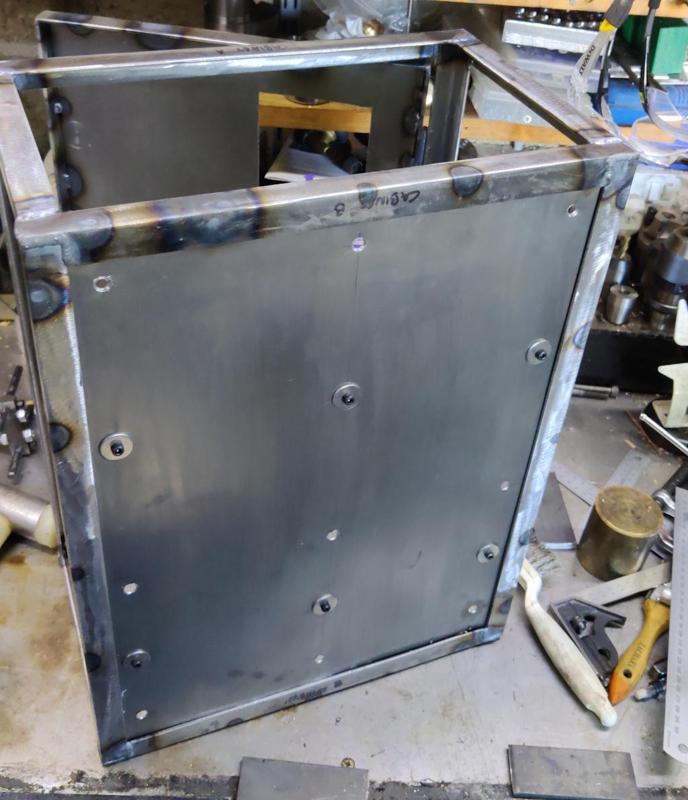
I could then place the sheet into the back panel and do a few tack welds all the way round. I'd been doing quite well at welding yesterday but, while it went fine on these joints, I dipped the tungsten in the weld pool quite a few times today, making me glad I had quite a lot of them ready ground so I could quickly swap them out after each mistake. Anyway, it got done:
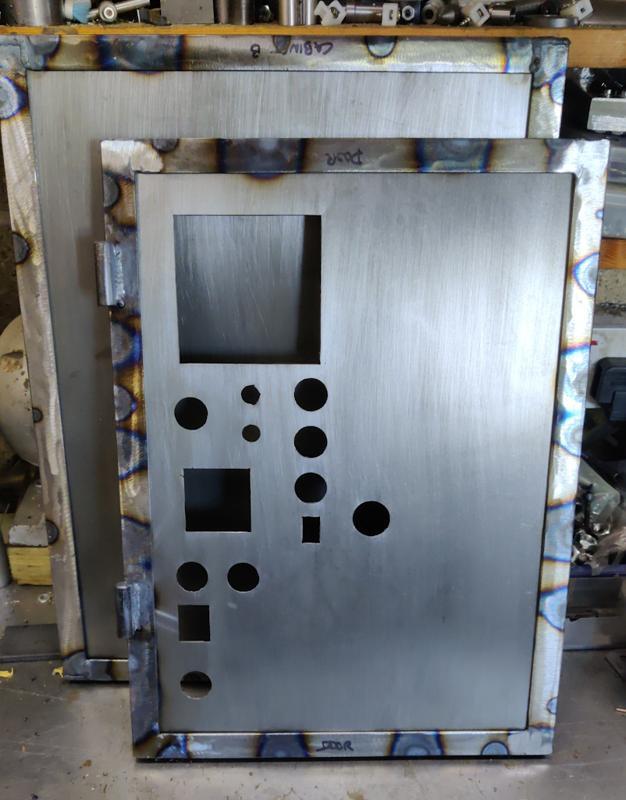
As did the door insert, which had a somewhat higher density of tacks along the left-hand edge as that's where all the controls are and hence it'll see a bit more force from push buttons being pressed:
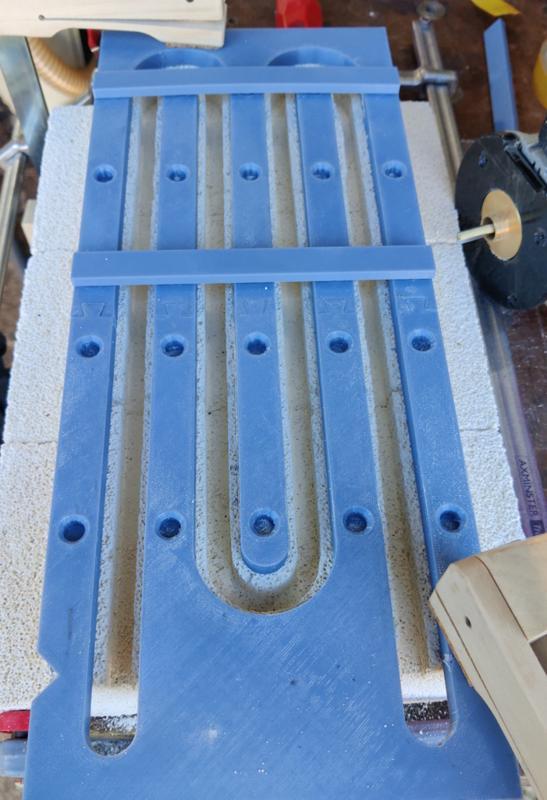
Overnight, I'd 3D-printed a guide (with a 17 mm wide slot) to help with preparing the blocks for the heating element:
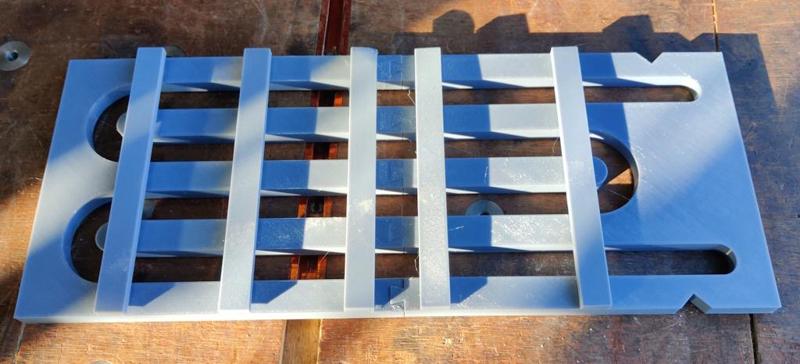
The plan with this is to have the heating element captive (by having an undercut slot). I'm not especially confident of how that will work as the fire bricks are incredibly brittle and it wouldn't take much for the retaining lip to break.
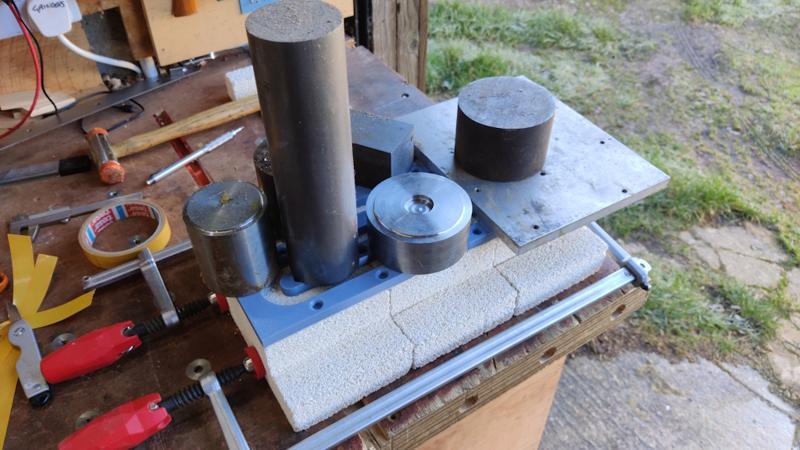
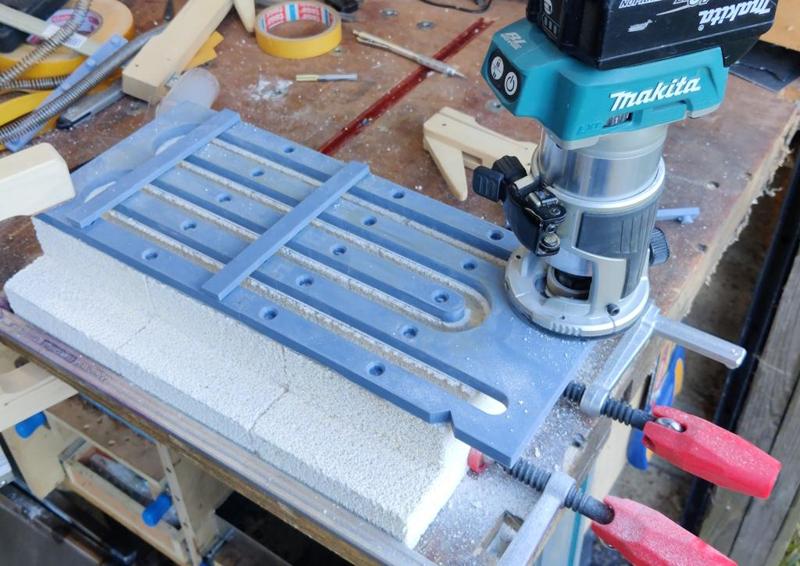
To hold the guide in place, I expected (correctly as it turned out) to need to use clamps and such-like. The little cross-pieces you can see fitted to the guide are there to hold the fingers in place while routing grooves in other areas (but they obviously need to be removed when the router is in that area). In a fit of optimism, I decided to try some double-sided tape just on the off-chance it would stick to the fire bricks:
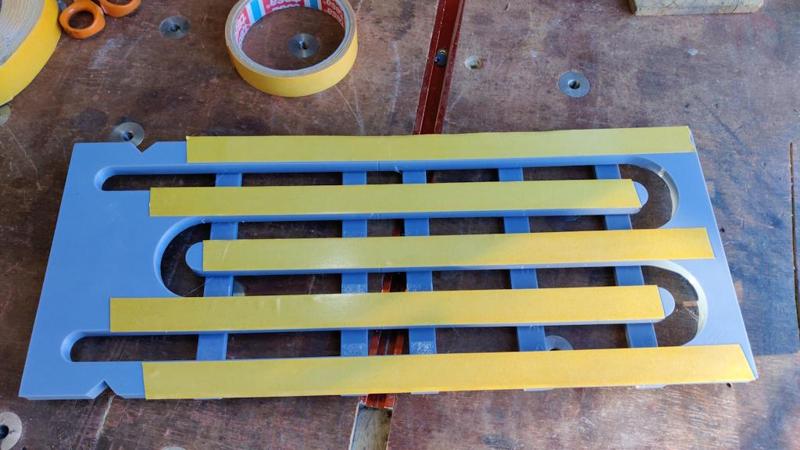
After removing the backing paper, I placed the frame on the bricks and covered it in heavy bits of steel to hold it in place.
Once it had been left for 10 minutes or so, I removed the weights. It took the lightest of touches to remove the guide from the bricks, so the tape didn't work. Not a great surprise, but it was worth a try. These are the router bits and guide bushes I intended to use:

In the end I didn't bother with the little key-hole cutter (which was only intended to be used for a light undercut to deal with the area where the cove (?) bit didn't cut). The 6.35 mm (1/4") straight bit was used with a 14 mm guide bush, which hence allowed it to move 3 mm in the 17 mm wide slot, producing a 9.35 mm wide opening. The cove bit is 12.7 mm (1/2") diameter and is used with a 16 mm guide bush, producing a 13.7 mm opening. In practise of course, none of those dimensions will be anywhere near that precise, but that was the aim. For reference, the element coil is a little over 13 mm diameter.
Routing out the groove was a bit of a plod as I had to keep moving clamps and cross-bars. For the first pass (with the straight cutter), I fitted the vacuum attachment to the little trim router, which worked remarkably well at catching most of the dust produced (I still had the respirator on just in case). This photo shows how it looked part-way through routing the slot...
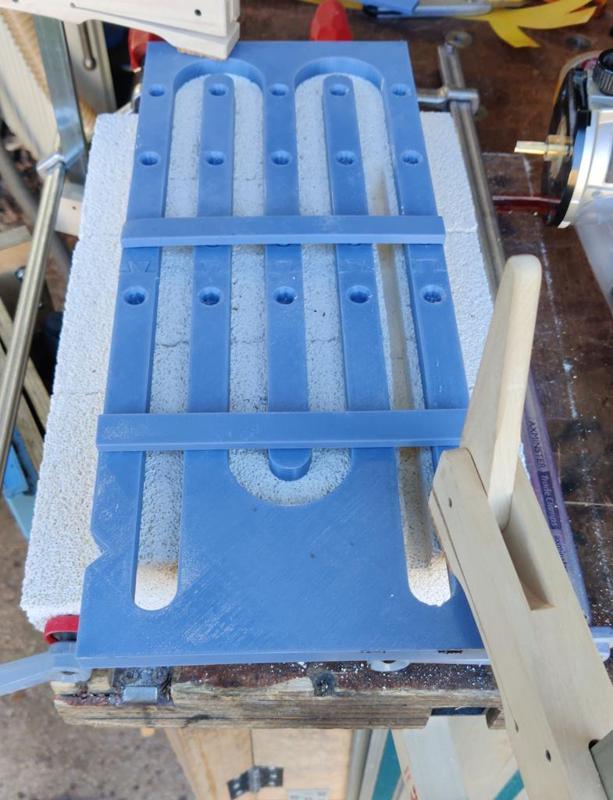
... and this one shows the straight slot finished:
For the work with the cove bit, I got rid of the vacuum attachment (but kept the respirator on). That was partly because there would be less dust produced in this step, but mostly because I couldn't remove the router from the slot when I was moving the cross-bars around and the vacuum hose would have been a bit unwieldy (with it attached, I couldn't have just left the router sitting in place while moving the bars around as the weight of the vacuum hose would have pulled the cutter straight through the fire brick).
Anyway, it didn't take that long to go all the way around the groove. There were quite a few little breaks, resulting in a rather shabby edge, but it worked better than I thought it would (I didn't have very high hopes for this process!)
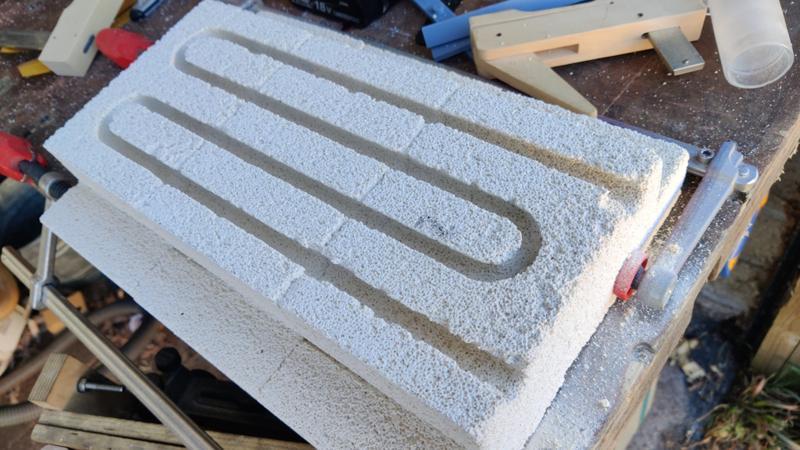
I haven't tried feeding the wire all the way round yet (as it still needs stretching out a little more), but I did a quick test fit and it went in relatively easily:

I wiped them over with some paper towel and then attacked them with a wire brush. I could have oiled them but I knew I was going to weld them almost immediately so I would have had to clean the oil off again very soon. The wire brush was quite a good work-out for the start of the day anyway considering how much the temperature had dropped overnight.
The insert for the back of the control cabinet needed a couple of little cut-outs (because of the weld nuts that I fitted yesterday). I cut out the pockets with a junior hacksaw (as it has finer teeth than my big hacksaw and hence is better for cutting thin sheet). I probably wrecked the blade in the process as it took my an embarrassing amount of time to remember that it was set up (as they usually are) to cut on the push stroke and I've been doing a lot of work with Japanese woodwork pull saws recently! Nevertheless, it did the job quite quickly:
I could then place the sheet into the back panel and do a few tack welds all the way round. I'd been doing quite well at welding yesterday but, while it went fine on these joints, I dipped the tungsten in the weld pool quite a few times today, making me glad I had quite a lot of them ready ground so I could quickly swap them out after each mistake. Anyway, it got done:
As did the door insert, which had a somewhat higher density of tacks along the left-hand edge as that's where all the controls are and hence it'll see a bit more force from push buttons being pressed:
Overnight, I'd 3D-printed a guide (with a 17 mm wide slot) to help with preparing the blocks for the heating element:
The plan with this is to have the heating element captive (by having an undercut slot). I'm not especially confident of how that will work as the fire bricks are incredibly brittle and it wouldn't take much for the retaining lip to break.
To hold the guide in place, I expected (correctly as it turned out) to need to use clamps and such-like. The little cross-pieces you can see fitted to the guide are there to hold the fingers in place while routing grooves in other areas (but they obviously need to be removed when the router is in that area). In a fit of optimism, I decided to try some double-sided tape just on the off-chance it would stick to the fire bricks:
After removing the backing paper, I placed the frame on the bricks and covered it in heavy bits of steel to hold it in place.
Once it had been left for 10 minutes or so, I removed the weights. It took the lightest of touches to remove the guide from the bricks, so the tape didn't work. Not a great surprise, but it was worth a try. These are the router bits and guide bushes I intended to use:
In the end I didn't bother with the little key-hole cutter (which was only intended to be used for a light undercut to deal with the area where the cove (?) bit didn't cut). The 6.35 mm (1/4") straight bit was used with a 14 mm guide bush, which hence allowed it to move 3 mm in the 17 mm wide slot, producing a 9.35 mm wide opening. The cove bit is 12.7 mm (1/2") diameter and is used with a 16 mm guide bush, producing a 13.7 mm opening. In practise of course, none of those dimensions will be anywhere near that precise, but that was the aim. For reference, the element coil is a little over 13 mm diameter.
Routing out the groove was a bit of a plod as I had to keep moving clamps and cross-bars. For the first pass (with the straight cutter), I fitted the vacuum attachment to the little trim router, which worked remarkably well at catching most of the dust produced (I still had the respirator on just in case). This photo shows how it looked part-way through routing the slot...
... and this one shows the straight slot finished:
For the work with the cove bit, I got rid of the vacuum attachment (but kept the respirator on). That was partly because there would be less dust produced in this step, but mostly because I couldn't remove the router from the slot when I was moving the cross-bars around and the vacuum hose would have been a bit unwieldy (with it attached, I couldn't have just left the router sitting in place while moving the bars around as the weight of the vacuum hose would have pulled the cutter straight through the fire brick).
Anyway, it didn't take that long to go all the way around the groove. There were quite a few little breaks, resulting in a rather shabby edge, but it worked better than I thought it would (I didn't have very high hopes for this process!)
I haven't tried feeding the wire all the way round yet (as it still needs stretching out a little more), but I did a quick test fit and it went in relatively easily:
Blobber
Forum Supporter
- Messages
- 3,771
- Location
- lincolnshire
Looking good! I think its going to mighty fiddly working that element around the bends!On inspecting the steel sheets (in their citric acid bath) this morning, they still looked slightly rusty, but I pulled them out and gave them a quick wipe with a tissue and the rust came off really easily. At this point, you have to work fast as it's astonishing how quickly they'll start to tarnish once they're out of the acid bath.
I wiped them over with some paper towel and then attacked them with a wire brush. I could have oiled them but I knew I was going to weld them almost immediately so I would have had to clean the oil off again very soon. The wire brush was quite a good work-out for the start of the day anyway considering how much the temperature had dropped overnight.
The insert for the back of the control cabinet needed a couple of little cut-outs (because of the weld nuts that I fitted yesterday). I cut out the pockets with a junior hacksaw (as it has finer teeth than my big hacksaw and hence is better for cutting thin sheet). I probably wrecked the blade in the process as it took my an embarrassing amount of time to remember that it was set up (as they usually are) to cut on the push stroke and I've been doing a lot of work with Japanese woodwork pull saws recently! Nevertheless, it did the job quite quickly:
I could then place the sheet into the back panel and do a few tack welds all the way round. I'd been doing quite well at welding yesterday but, while it went fine on these joints, I dipped the tungsten in the weld pool quite a few times today, making me glad I had quite a lot of them ready ground so I could quickly swap them out after each mistake. Anyway, it got done:
As did the door insert, which had a somewhat higher density of tacks along the left-hand edge as that's where all the controls are and hence it'll see a bit more force from push buttons being pressed:
Overnight, I'd 3D-printed a guide (with a 17 mm wide slot) to help with preparing the blocks for the heating element:
The plan with this is to have the heating element captive (by having an undercut slot). I'm not especially confident of how that will work as the fire bricks are incredibly brittle and it wouldn't take much for the retaining lip to break.
To hold the guide in place, I expected (correctly as it turned out) to need to use clamps and such-like. The little cross-pieces you can see fitted to the guide are there to hold the fingers in place while routing grooves in other areas (but they obviously need to be removed when the router is in that area). In a fit of optimism, I decided to try some double-sided tape just on the off-chance it would stick to the fire bricks:
After removing the backing paper, I placed the frame on the bricks and covered it in heavy bits of steel to hold it in place.
Once it had been left for 10 minutes or so, I removed the weights. It took the lightest of touches to remove the guide from the bricks, so the tape didn't work. Not a great surprise, but it was worth a try. These are the router bits and guide bushes I intended to use:
In the end I didn't bother with the little key-hole cutter (which was only intended to be used for a light undercut to deal with the area where the cove (?) bit didn't cut). The 6.35 mm (1/4") straight bit was used with a 14 mm guide bush, which hence allowed it to move 3 mm in the 17 mm wide slot, producing a 9.35 mm wide opening. The cove bit is 12.7 mm (1/2") diameter and is used with a 16 mm guide bush, producing a 13.7 mm opening. In practise of course, none of those dimensions will be anywhere near that precise, but that was the aim. For reference, the element coil is a little over 13 mm diameter.
Routing out the groove was a bit of a plod as I had to keep moving clamps and cross-bars. For the first pass (with the straight cutter), I fitted the vacuum attachment to the little trim router, which worked remarkably well at catching most of the dust produced (I still had the respirator on just in case). This photo shows how it looked part-way through routing the slot...
... and this one shows the straight slot finished:
For the work with the cove bit, I got rid of the vacuum attachment (but kept the respirator on). That was partly because there would be less dust produced in this step, but mostly because I couldn't remove the router from the slot when I was moving the cross-bars around and the vacuum hose would have been a bit unwieldy (with it attached, I couldn't have just left the router sitting in place while moving the bars around as the weight of the vacuum hose would have pulled the cutter straight through the fire brick).
Anyway, it didn't take that long to go all the way around the groove. There were quite a few little breaks, resulting in a rather shabby edge, but it worked better than I thought it would (I didn't have very high hopes for this process!)
I haven't tried feeding the wire all the way round yet (as it still needs stretching out a little more), but I did a quick test fit and it went in relatively easily:

Dr.Al
Forum Supporter
- Messages
- 2,788
- Location
- Gloucestershire, UK
Yes, I think you're right.Looking good! I think its going to mighty fiddly working that element around the bends!
Dr.Al
Forum Supporter
- Messages
- 2,788
- Location
- Gloucestershire, UK
I started the afternoon with a repeat of the last job of the morning: routing out the slots in a second set of bricks (after cutting the rebate in one as I'd dropped one of the set and it had got damaged):
With the grooves finished I was very happy to be able to put all the routing paraphernalia away and get on with another job. It was perhaps a little unusual that I didn't need ear defenders for the electric router (as it was running on its lowest speed setting and cutting something relatively soft) but I did need ear defenders for the hand tool job that followed it: hand filing the openings in the door to get a good fit for the various things that will go in.
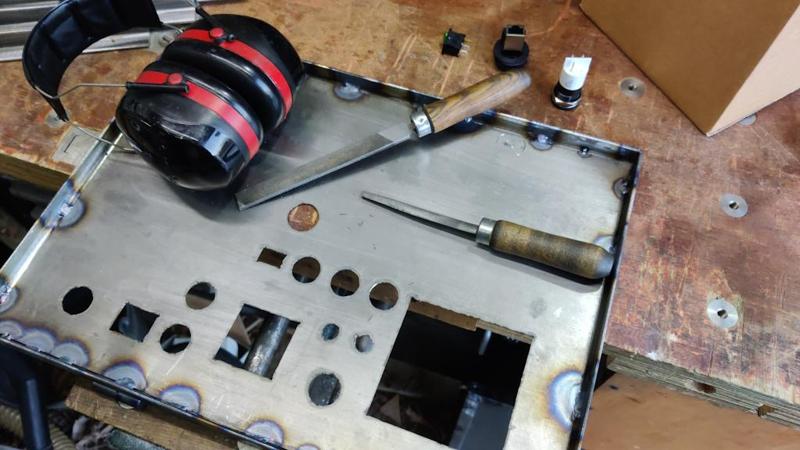
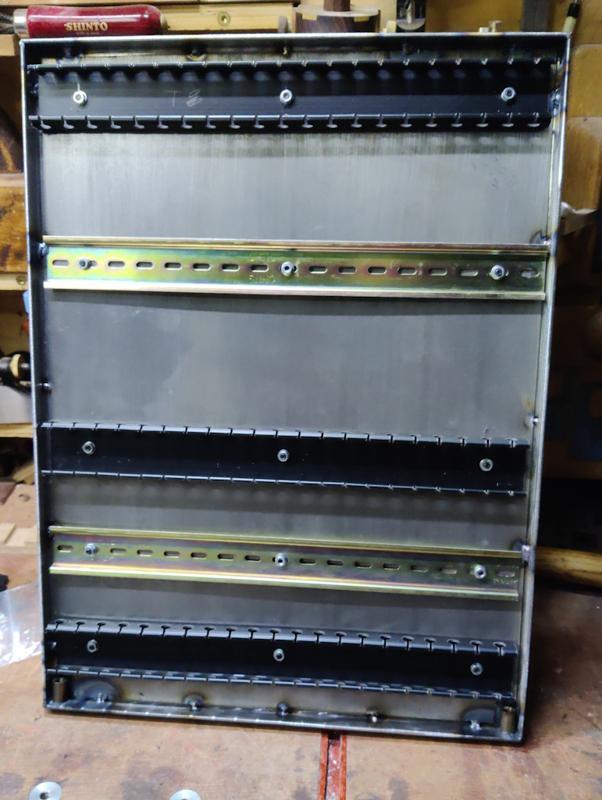
With the holes suitably fettled I moved onto the back panel and laid out the trunking and DIN rail to suit the various bits that were going to be fitted there:
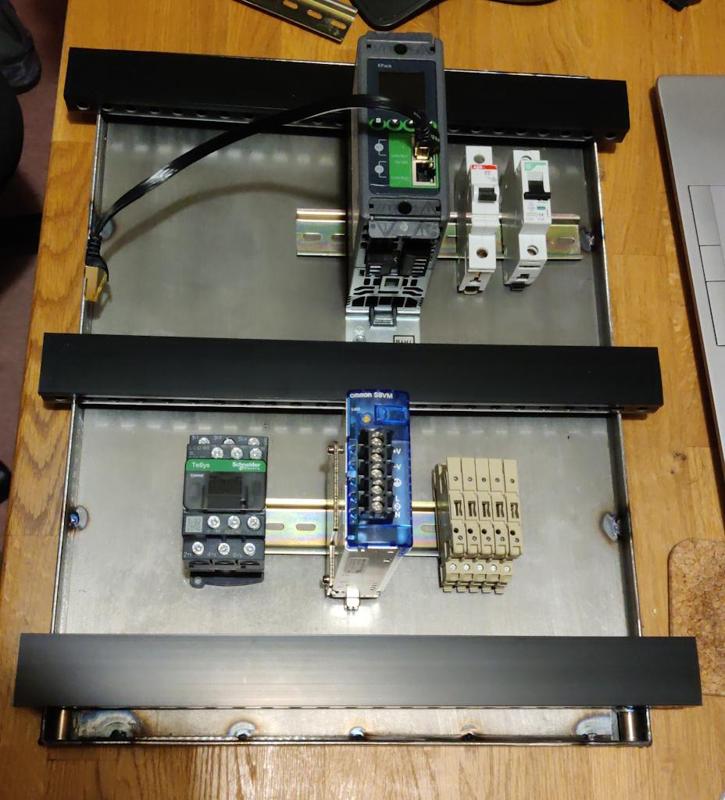
I could then drill the holes in the back of the panel. My original plan had been to drill these with a 4 mm step drill and then countersink them for M4 countersunk screws. I did that...
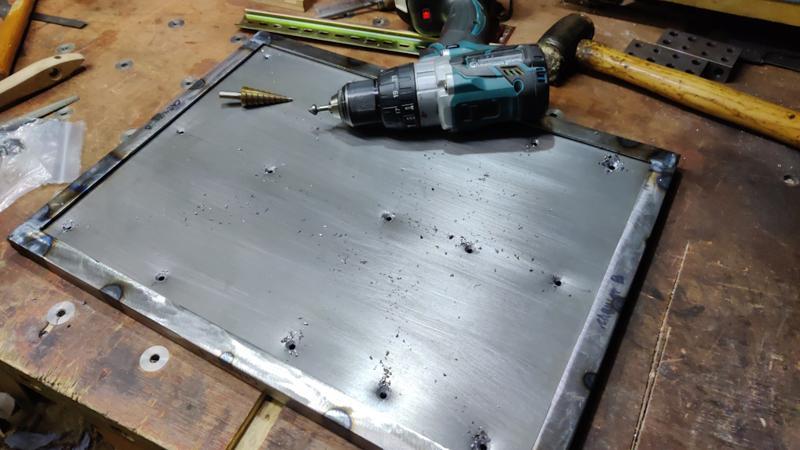
... but (as I should have realised) the metal was too thin for a good countersink so once I'd deburred the inside surface, I ended up with an oversize hole with not much countersink left. To resolve that, I fitted the various bits and pieces using cap screws and penny washers on the outside and with nuts and normal washers on the inside. In a surprising rebuff to Murphy, I had exactly the right number of M4 penny washers for the job!
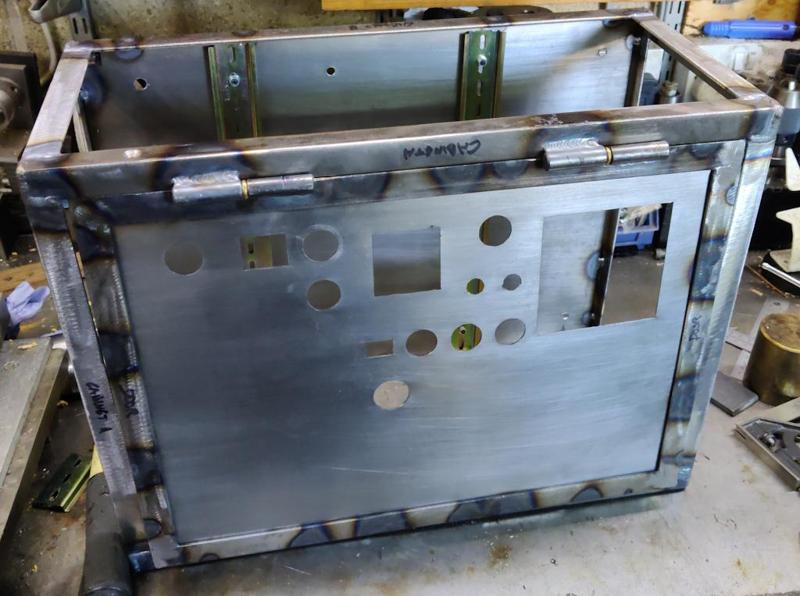
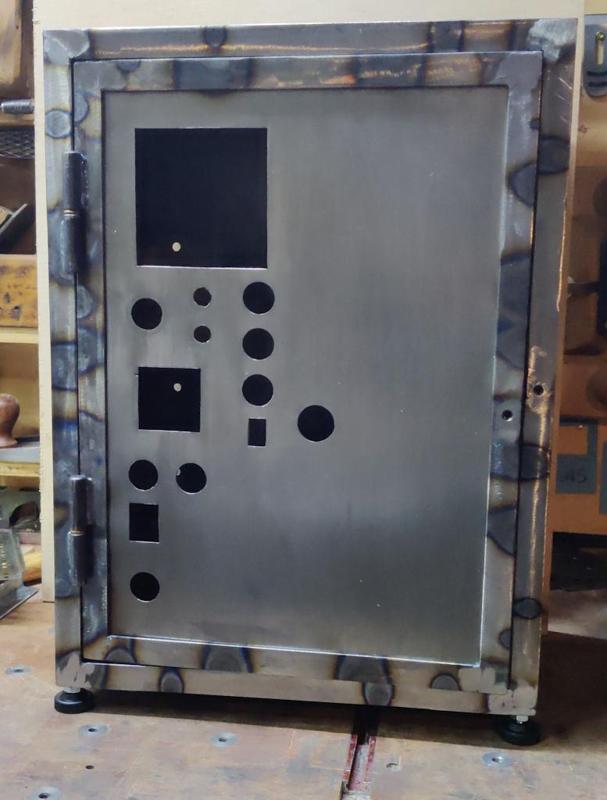
Finally, I could retreat to the relative warmth of the dining room and fit all the various bits and bobs into the door panel and get an idea of what it will look like:
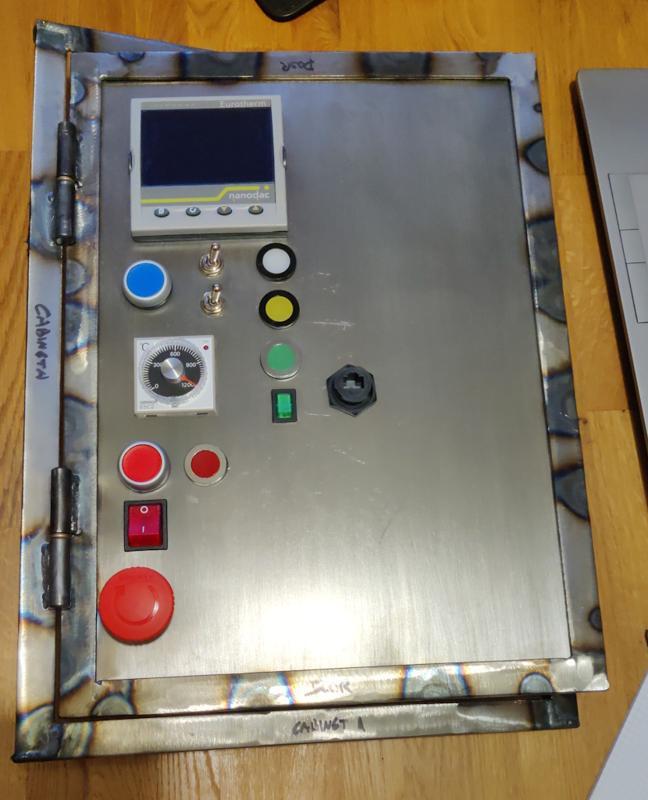
Now that I can fit stuff to the front and back of the cabinet, I can work out the required depth and cut the last four bits of cabinet angle iron to length. Hopefully tomorrow I'll get the cabinet frame welded together and start preparing the sheets for the sides, top and bottom.
With the grooves finished I was very happy to be able to put all the routing paraphernalia away and get on with another job. It was perhaps a little unusual that I didn't need ear defenders for the electric router (as it was running on its lowest speed setting and cutting something relatively soft) but I did need ear defenders for the hand tool job that followed it: hand filing the openings in the door to get a good fit for the various things that will go in.
With the holes suitably fettled I moved onto the back panel and laid out the trunking and DIN rail to suit the various bits that were going to be fitted there:
I could then drill the holes in the back of the panel. My original plan had been to drill these with a 4 mm step drill and then countersink them for M4 countersunk screws. I did that...
... but (as I should have realised) the metal was too thin for a good countersink so once I'd deburred the inside surface, I ended up with an oversize hole with not much countersink left. To resolve that, I fitted the various bits and pieces using cap screws and penny washers on the outside and with nuts and normal washers on the inside. In a surprising rebuff to Murphy, I had exactly the right number of M4 penny washers for the job!
Finally, I could retreat to the relative warmth of the dining room and fit all the various bits and bobs into the door panel and get an idea of what it will look like:
Now that I can fit stuff to the front and back of the cabinet, I can work out the required depth and cut the last four bits of cabinet angle iron to length. Hopefully tomorrow I'll get the cabinet frame welded together and start preparing the sheets for the sides, top and bottom.
Dr.Al
Forum Supporter
- Messages
- 2,788
- Location
- Gloucestershire, UK
The first job this morning was welding the control cabinet frame together. I cut four 180 mm lengths of angle iron and tacked them to the door frame. I then clamped the top frame on and tack welded that in place:
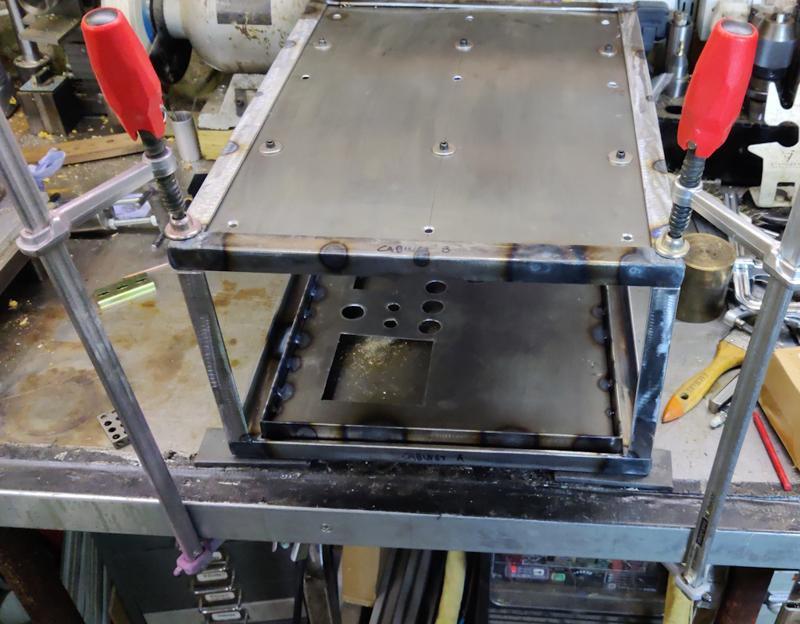
After checking how square it was (not entirely, but close enough: I rarely manage perfectly square welded constructions when there are this many joints involved), I could finish the various welds off. This was a lot more awkward than previous welds due to the size of the object. This orientation in particular involved standing up to weld, which isn't the end of the world, but is definitely more difficult than doing it seated:
This orientation wasn't too bad:
While I had the gas on and the welder powered, I drilled a 10 mm hole in the cabinet frame and set an M6 weld nut into the hole:
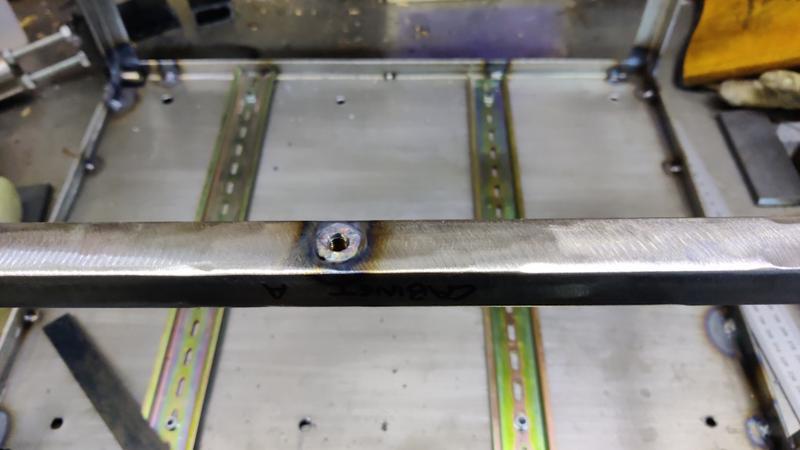
That'll be used for the door latch.
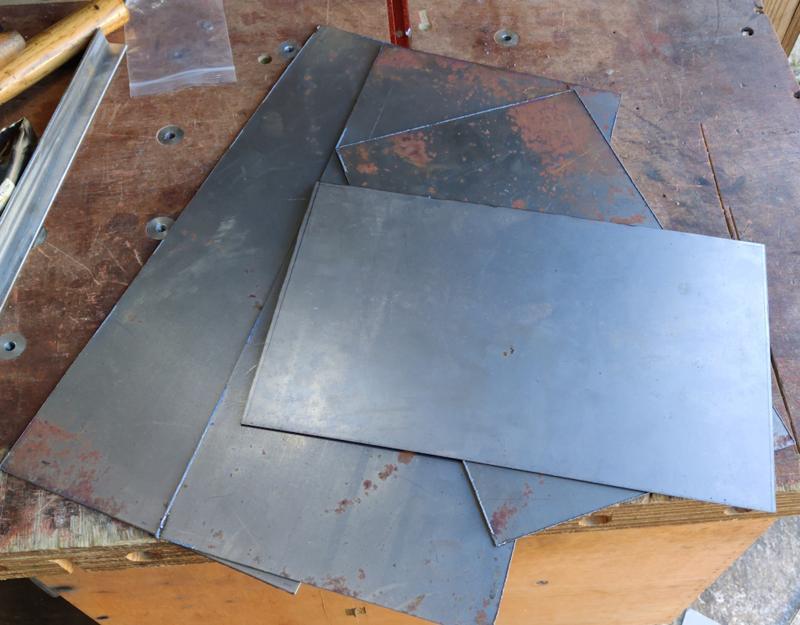
The last big job to sort out on the control cabinet (if you ignore the huge job that'll be wiring it all up!) was to cut out the sheets for the sides, top and bottom. Most of these came out of the same sheet of rusty 1.2 mm sheet, but I didn't have quite enough (without breaking into a new piece) and the bottom of the cabinet won't need much strength, so I just used an off-cut of (not rusty this time!) 0.8 mm sheet:
The 3D printer had again been active this morning preparing a couple of extra templates for plasma cutting:
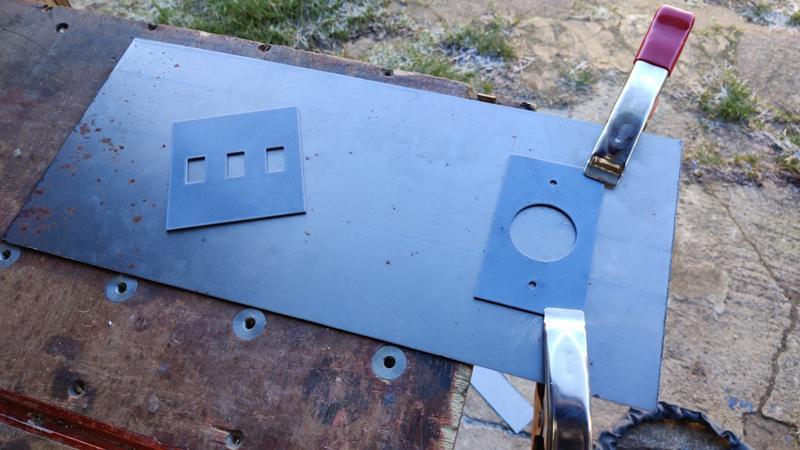
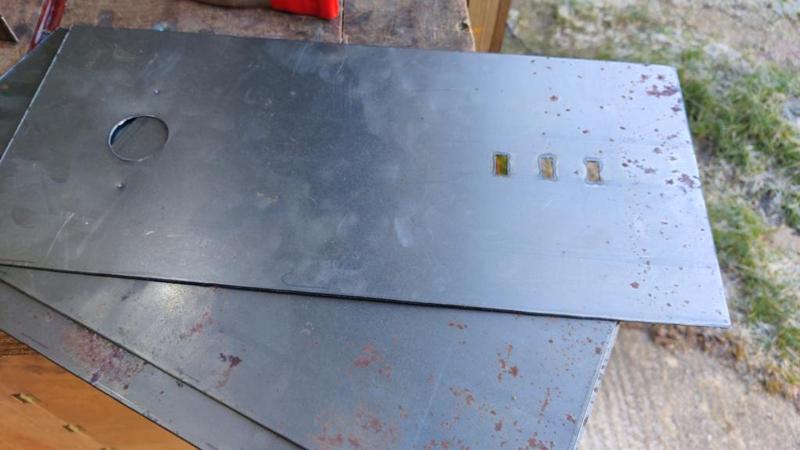
The cutter quickly roughed out the holes (note that I just marked the positions of the two smallest holes as I figured they'd be easier to drill):
There will still be another hole in the side panel (for the wires from the door interlock), but that's likely to be circular so I'll just drill that as and when I've decided where it needs to go and what type of connector to use (probably a 3-pin DIN connector as I think I have some somewhere).
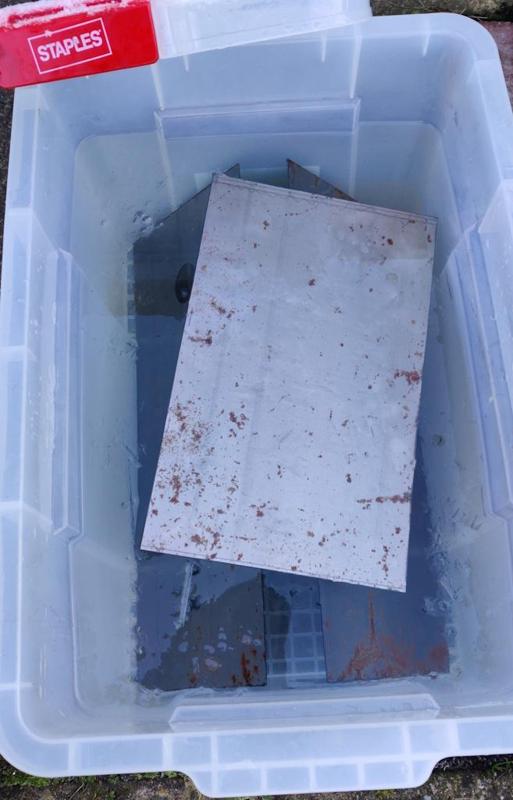
The rusty pieces then went into the citric acid bath (after I'd broken up the ice on the top layer). Hopefully it'll still work despite being even colder now than it was when I did the first two pieces.
There's not much more I can do with the cabinet until the rust has gone and those panels can be welded in place. I don't want to start wiring it up yet as I'd be worried about welding the panels in with all the wires and plastic parts in place (even ignoring the fact they'd probably get in the way). However, once they're welded in then I can bring the cabinet into the house and wire it up in the warmth! It'll all have to come out again when I paint the cabinet (a job I detest), but that's not going to happen for quite a while yet.
After checking how square it was (not entirely, but close enough: I rarely manage perfectly square welded constructions when there are this many joints involved), I could finish the various welds off. This was a lot more awkward than previous welds due to the size of the object. This orientation in particular involved standing up to weld, which isn't the end of the world, but is definitely more difficult than doing it seated:
This orientation wasn't too bad:
While I had the gas on and the welder powered, I drilled a 10 mm hole in the cabinet frame and set an M6 weld nut into the hole:
That'll be used for the door latch.
The last big job to sort out on the control cabinet (if you ignore the huge job that'll be wiring it all up!) was to cut out the sheets for the sides, top and bottom. Most of these came out of the same sheet of rusty 1.2 mm sheet, but I didn't have quite enough (without breaking into a new piece) and the bottom of the cabinet won't need much strength, so I just used an off-cut of (not rusty this time!) 0.8 mm sheet:
The 3D printer had again been active this morning preparing a couple of extra templates for plasma cutting:
The cutter quickly roughed out the holes (note that I just marked the positions of the two smallest holes as I figured they'd be easier to drill):
There will still be another hole in the side panel (for the wires from the door interlock), but that's likely to be circular so I'll just drill that as and when I've decided where it needs to go and what type of connector to use (probably a 3-pin DIN connector as I think I have some somewhere).
The rusty pieces then went into the citric acid bath (after I'd broken up the ice on the top layer). Hopefully it'll still work despite being even colder now than it was when I did the first two pieces.
There's not much more I can do with the cabinet until the rust has gone and those panels can be welded in place. I don't want to start wiring it up yet as I'd be worried about welding the panels in with all the wires and plastic parts in place (even ignoring the fact they'd probably get in the way). However, once they're welded in then I can bring the cabinet into the house and wire it up in the warmth! It'll all have to come out again when I paint the cabinet (a job I detest), but that's not going to happen for quite a while yet.
Dr.Al
Forum Supporter
- Messages
- 2,788
- Location
- Gloucestershire, UK
I decided to check the citric bath after lunch and, while the sheets still looked rusty, the rust wiped off with a paper towel, so that was a bit of a result. I think I'd been remembering how long it took to remove mill scale with citric acid; that's a lot thicker than this very light dusting of rust. After wiping with a paper towel, this is what the sheets looked like:
As before, they got an aggressive brushing with a wire brush (which was quite welcome exercise to warm up in the 2°C ambient):
As before, I cut out the corners where necessary, firstly using my junior hacksaw until, sadly, it snapped on the penultimate cut:
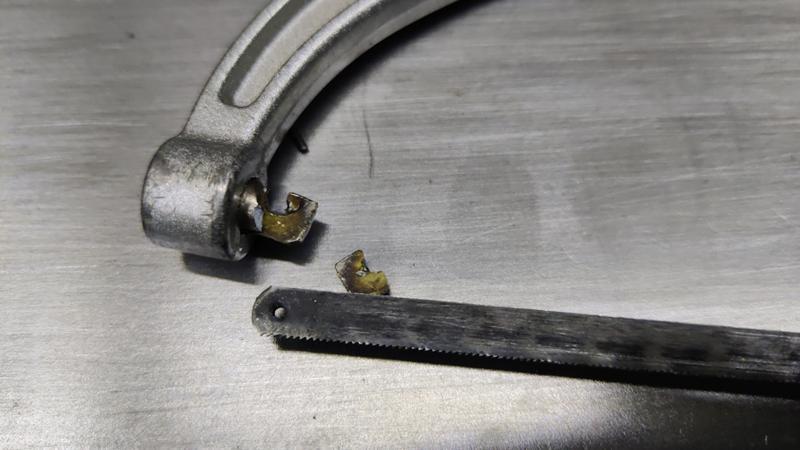
I did the last one with the big hacksaw. There was then a lot of tack welding and a lot of cursing. This was probably some of my worst welding ever: I'd left a gap between the sheets so that I could weld them to the angle iron. I should have left a much, much bigger gap as trying to weld them to the angle iron without melting the neighbouring sheet proved to be extremely difficult, especially given that the frame was getting more and more closed up as a result of all the sheets on the sides!
Anyway, I got it done (no photos of the process) and also fitted another M6 weld nut into the door (for the other part of the latch). I don't think there's any more welding to do on the control cabinet now, so I could fit the (cheap and a bit nasty, but they'll do) feet into the threaded holes in the bottom.
There are still some more holes to drill in the two sides, but some of those need a bit of thinking about locations so I'll probably do them after I've done some of the wiring.
I need to get on with the chamber itself soon, although progress might be a bit slow given how wet the next few days are forecast to be (some of the jobs I have to do need to be done outside really). One thing I did get done today was to stretch out the element coils a bit more. @Kram had made a couple of comments about the elements that proved very useful. One was that the wire work hardens and benefits from being heated up with a propane torch after coiling to allow it to be manipulated more easily. The other comment was that when it's hot, it sags under its own weight. That gave me a simple idea for how to stretch the coils out: hold the element vertically and apply heat with a propane torch. As it starts to glow red, that bit of element stretches (under the weight of the rest of the coil) and you can control the amount of stretch by withdrawing the propane torch just before it gets to the expansion you want:
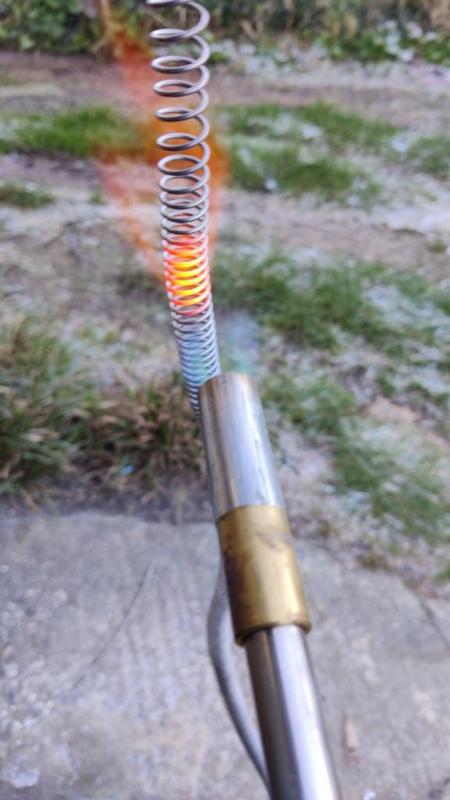
That was quick and worked fairly well, although there were a couple of areas where I hadn't stretched the coils at all and, as a result of the turns touching each other, those areas required more heat and the areas either side thus stretched a bit more than I wanted. Being annealed, it was quite easy to push those areas roughly back together: I'm not aiming for perfectly uniform spacing or anything.
I used the routing template as a convenient way of laying the coils out to measure the resistance I'll end up with:
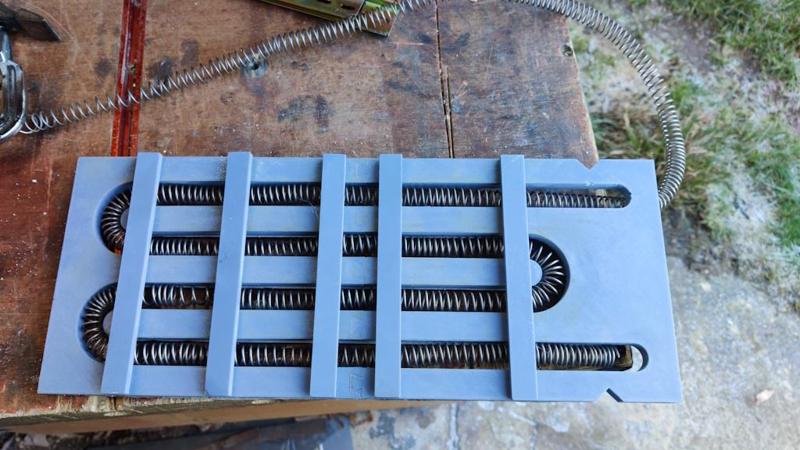
According to my cheap and simple multimeter, that gave each element as about 10 Ω, which (when in series) will result in up to 12.5 A flowing through the coil (assuming I don't use the thyristor pack to reduce that). That's slightly higher than I was aiming for, but good enough if I run it off a 16 A plug.
I'll probably bring the (decent, Fluke) multimeter I use at work home sometime during the week so I can double check the resistance using something I trust a bit more.
As before, they got an aggressive brushing with a wire brush (which was quite welcome exercise to warm up in the 2°C ambient):
As before, I cut out the corners where necessary, firstly using my junior hacksaw until, sadly, it snapped on the penultimate cut:
I did the last one with the big hacksaw. There was then a lot of tack welding and a lot of cursing. This was probably some of my worst welding ever: I'd left a gap between the sheets so that I could weld them to the angle iron. I should have left a much, much bigger gap as trying to weld them to the angle iron without melting the neighbouring sheet proved to be extremely difficult, especially given that the frame was getting more and more closed up as a result of all the sheets on the sides!
Anyway, I got it done (no photos of the process) and also fitted another M6 weld nut into the door (for the other part of the latch). I don't think there's any more welding to do on the control cabinet now, so I could fit the (cheap and a bit nasty, but they'll do) feet into the threaded holes in the bottom.
There are still some more holes to drill in the two sides, but some of those need a bit of thinking about locations so I'll probably do them after I've done some of the wiring.
I need to get on with the chamber itself soon, although progress might be a bit slow given how wet the next few days are forecast to be (some of the jobs I have to do need to be done outside really). One thing I did get done today was to stretch out the element coils a bit more. @Kram had made a couple of comments about the elements that proved very useful. One was that the wire work hardens and benefits from being heated up with a propane torch after coiling to allow it to be manipulated more easily. The other comment was that when it's hot, it sags under its own weight. That gave me a simple idea for how to stretch the coils out: hold the element vertically and apply heat with a propane torch. As it starts to glow red, that bit of element stretches (under the weight of the rest of the coil) and you can control the amount of stretch by withdrawing the propane torch just before it gets to the expansion you want:
That was quick and worked fairly well, although there were a couple of areas where I hadn't stretched the coils at all and, as a result of the turns touching each other, those areas required more heat and the areas either side thus stretched a bit more than I wanted. Being annealed, it was quite easy to push those areas roughly back together: I'm not aiming for perfectly uniform spacing or anything.
I used the routing template as a convenient way of laying the coils out to measure the resistance I'll end up with:
According to my cheap and simple multimeter, that gave each element as about 10 Ω, which (when in series) will result in up to 12.5 A flowing through the coil (assuming I don't use the thyristor pack to reduce that). That's slightly higher than I was aiming for, but good enough if I run it off a 16 A plug.
I'll probably bring the (decent, Fluke) multimeter I use at work home sometime during the week so I can double check the resistance using something I trust a bit more.
Dr.Al
Forum Supporter
- Messages
- 2,788
- Location
- Gloucestershire, UK
I've made a decision that I'll probably come to regret in a week or so. I'm going to paint the control cabinet (inside and out) before trying to wire it up. I detest painting (hence the comment about expecting to regret it), but I think it's a necessary evil in this case as it'll get stored in a lock-up rather than in my relatively dry garage and hence could be at risk of rusting.
I've ordered some general purpose metal paint for the control cabinet and some (relatively) high temperature paint for the chamber metalwork. That should all be here later in the week, so I'll probably grimace and get the brushes out next weekend.
It did, however, get me thinking about the sheet-to-angle joints on the various parts of the cabinet, both outside:

and inside:

I'm wondering if it might be better to fillet those corners with a bead of something-or-other before painting it. I'm thinking of the look of a silicone sealant bead around a bath, but not in silicone, obviously.
What would be a good option for this? Car body filler (which I've never used before) seems an obvious candidate given I'm trying to fill a gap in some metalwork, but would something cheap and easy like decorator's caulk work? Is there a better (for which read "easy to apply") option anyone can suggest?
I've ordered some general purpose metal paint for the control cabinet and some (relatively) high temperature paint for the chamber metalwork. That should all be here later in the week, so I'll probably grimace and get the brushes out next weekend.
It did, however, get me thinking about the sheet-to-angle joints on the various parts of the cabinet, both outside:
and inside:
I'm wondering if it might be better to fillet those corners with a bead of something-or-other before painting it. I'm thinking of the look of a silicone sealant bead around a bath, but not in silicone, obviously.
What would be a good option for this? Car body filler (which I've never used before) seems an obvious candidate given I'm trying to fill a gap in some metalwork, but would something cheap and easy like decorator's caulk work? Is there a better (for which read "easy to apply") option anyone can suggest?
Kram
Member
- Messages
- 8,674
- Location
- Sussex
6013 in 1.6mm is a good filler ")
Filler will attract moisture so needs to be painted soon after, and effort to sand it smooth after. Im not sure builders filler would stick well to metal, so would choose the 2 part car stuff. Also more of a pain if additional welding needed in future.
The problem currently is cold weather, its not going to spray well or dry properly outside. I have a couple parts waiting and cant have solvent smell indoors - I'll warm the spray can in warm water and the part with heat gun, then into a sealed plastic box to dry indoors for a couple hours.
Dr.Al
Forum Supporter
- Messages
- 2,788
- Location
- Gloucestershire, UK
I'm sure it is, but I'm trying to hide the evidence of my welding, not show it off6013 in 1.6mm is a good filler
Filler will attract moisture so needs to be painted soon after, and effort to sand it smooth after. Im not sure builders filler would stick well to metal, so would choose the 2 part car stuff. Also more of a pain if additional welding needed in future.
I'm not expecting any more welding on the cabinet. Any recommendations for car filler? With all 4 edges on all 6 sides inside and out, there are a lot of edges to fillet so I don't want something too pricey!
I won't be spraying it, partly because of not really having a good place to do so, but mainly because my results with spraying have never been that much better than my brush results.The problem currently is cold weather, its not going to spray well or dry properly outside. I have a couple parts waiting and cant have solvent smell indoors - I'll warm the spray can in warm water and the part with heat gun, then into a sealed plastic box to dry indoors for a couple hours.
I haven't seen any spec. on minimum temperature to apply the paint I've ordered (it just says apply to cold metal). I might get in touch with the manufacturer & see what they suggest.
Dr.Al
Forum Supporter
- Messages
- 2,788
- Location
- Gloucestershire, UK
This stuff...
says "non-corrosive to metals" but doesn't specifically say that it'll stick to metal (it says it'll stick to "most building substrates", whatever that's supposed to mean).
Do you think it's worth a try or am I on a hiding to nothing?
says "non-corrosive to metals" but doesn't specifically say that it'll stick to metal (it says it'll stick to "most building substrates", whatever that's supposed to mean).
Do you think it's worth a try or am I on a hiding to nothing?
- Messages
- 24,191
- Location
- Birmingham
I've made a decision that I'll probably come to regret in a week or so. I'm going to paint the control cabinet (inside and out) before trying to wire it up. I detest painting (hence the comment about expecting to regret it), but I think it's a necessary evil in this case as it'll get stored in a lock-up rather than in my relatively dry garage and hence could be at risk of rusting.
I've ordered some general purpose metal paint for the control cabinet and some (relatively) high temperature paint for the chamber metalwork. That should all be here later in the week, so I'll probably grimace and get the brushes out next weekend.
The paint should be RAL 7035 light grey for control cabinets
Onoff
In the land of the unfinished project I am King!
- Messages
- 13,531
- Location
- Sevenoaks, UK
I've made a decision that I'll probably come to regret in a week or so. I'm going to paint the control cabinet (inside and out) before trying to wire it up. I detest painting (hence the comment about expecting to regret it), but I think it's a necessary evil in this case as it'll get stored in a lock-up rather than in my relatively dry garage and hence could be at risk of rusting.
I've ordered some general purpose metal paint for the control cabinet and some (relatively) high temperature paint for the chamber metalwork. That should all be here later in the week, so I'll probably grimace and get the brushes out next weekend.
It did, however, get me thinking about the sheet-to-angle joints on the various parts of the cabinet, both outside:
View attachment 479331
and inside:
View attachment 479333
I'm wondering if it might be better to fillet those corners with a bead of something-or-other before painting it. I'm thinking of the look of a silicone sealant bead around a bath, but not in silicone, obviously.
What would be a good option for this? Car body filler (which I've never used before) seems an obvious candidate given I'm trying to fill a gap in some metalwork, but would something cheap and easy like decorator's caulk work? Is there a better (for which read "easy to apply") option anyone can suggest?
I've a whole box of slightly (well a year) out of date intumescent sealer here. Been using it up the pub and it seems fine.
I might be heading to Gloucester in the next 3 weeks. You're welcome to 2,3,4 tubes. Unless you find yourself up Kent way?
Kram
Member
- Messages
- 8,674
- Location
- Sussex
One of these should do it

 www.toolstation.com
Or Upol Dolphin if you are planning to do anything wanting the best finish.
Theres also a Holts 1k filler which is no good for car stuff but would likely suit this - paint will wet it is the issue.
Big Boy | Shop All Big Boy | Toolstation
Shop Big Boy at Toolstation • Discover our full range today!
Or Upol Dolphin if you are planning to do anything wanting the best finish.
Theres also a Holts 1k filler which is no good for car stuff but would likely suit this - paint will wet it is the issue.